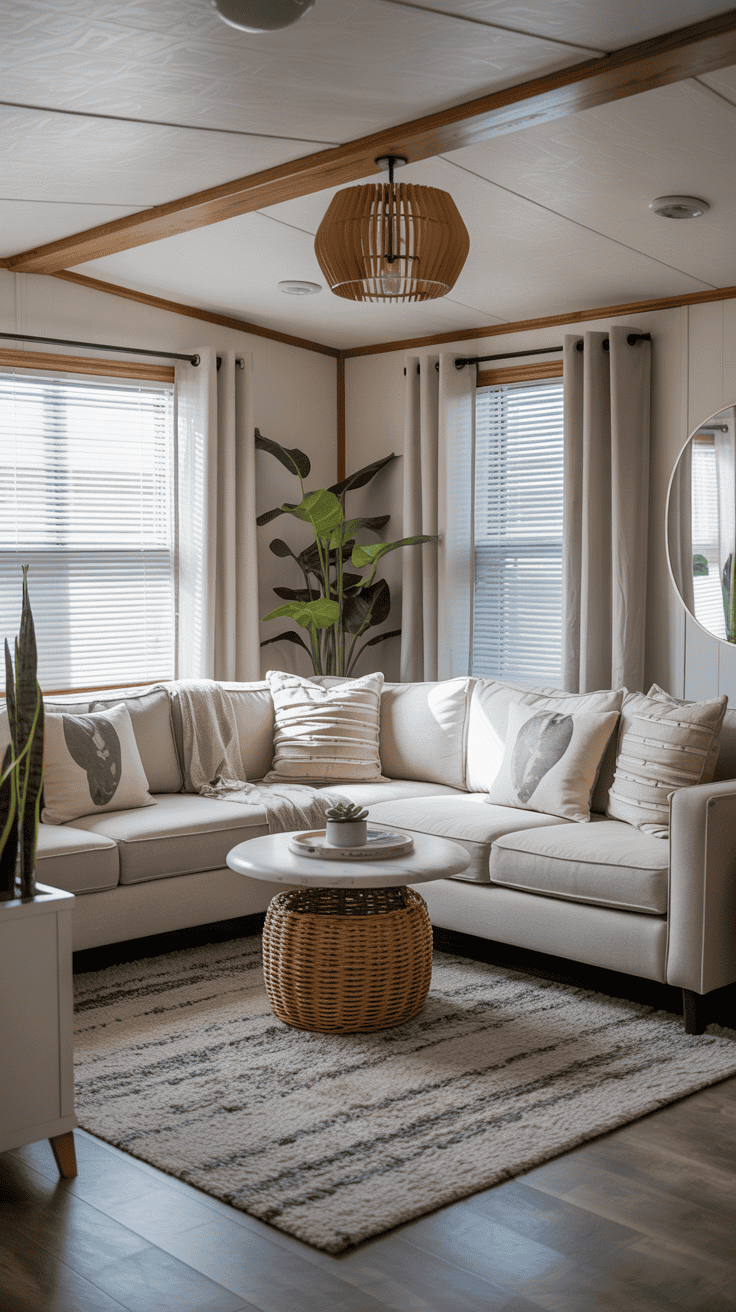
This post shows 10 Singlewide Mobile Home Ideas!
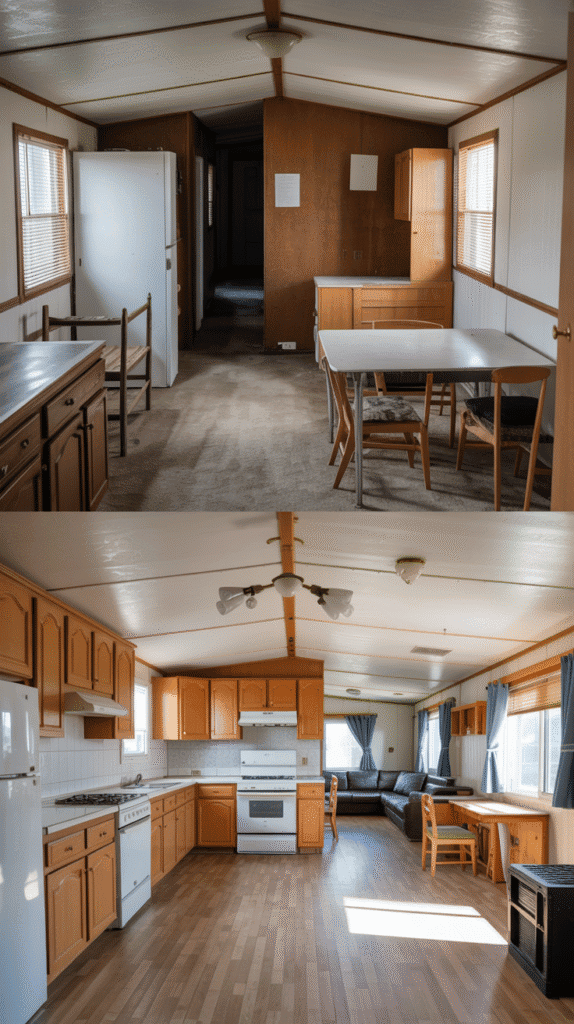
Look, I get it. You’re staring at your singlewide mobile home thinking, “How the heck can I make this place feel less like a sardine can and more like a home?” Trust me, I’ve been there. The good news? You don’t need a massive budget or a complete teardown to transform your space into something that’ll make your friends wonder if you hired some fancy interior designer.
I’ve spent years figuring out clever ways to maximize every square inch of mobile home living, and honestly, some of these tricks work so well it’s almost criminal :). Whether you’re dealing with cramped quarters or just want to add some serious style points, these 10 genius upgrades will change how you see your space forever.
10 Singlewide Mobile Home Ideas!
1. Install Floor-to-Ceiling Built-In Storage Units
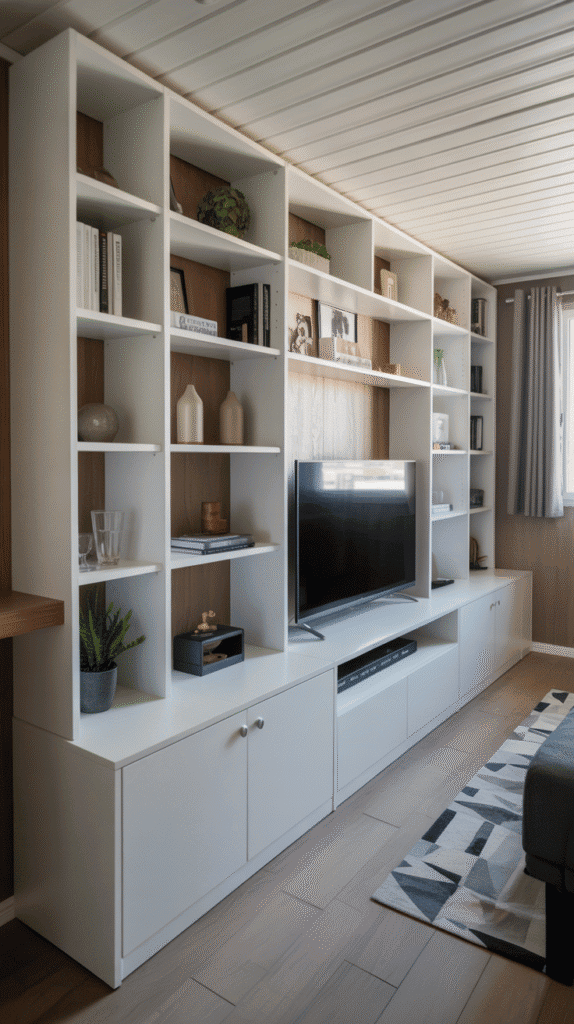
Ever walk into a tiny room and wonder where all the stuff goes? Floor-to-ceiling storage is your answer, and it’s way easier than you think. I’m talking about those sleek built-ins that make every wall work double duty.
Here’s the thing most people don’t realize: vertical space is your best friend in a singlewide. While everyone’s fighting over floor space, you’ve got all that unused wall real estate just begging for attention. I recently helped a neighbor install custom storage units in her living room, and the transformation was insane. We’re talking about going from cluttered chaos to organized paradise in one weekend.
The beauty of built-ins lies in their seamless integration. Unlike those bulky standalone bookcases that scream “I bought this at a big box store,” proper built-ins look like they were always meant to be there. You can customize them for books, display items, or even hide that collection of random cables we all seem to accumulate :/
Pro tip: Use the same paint color as your walls to make them disappear visually. This trick creates the illusion of more space while giving you tons of storage. FYI, this works especially well in narrow hallways where every inch counts.
2. Create an Open Floor Plan by Removing Non-Load-Bearing Walls
Okay, before you grab a sledgehammer and go full demo mode, let me be crystal clear: always check if a wall is load-bearing first. Trust me, you don’t want your roof caving in because you got a little too enthusiastic with wall removal.
That said, opening up your floor plan is hands-down one of the most dramatic changes you can make. I’ve seen singlewides that felt like a maze of tiny rooms transform into flowing, spacious homes just by removing a couple of strategic walls. The difference is night and day.
Most singlewides have at least one or two walls that exist purely to create separate rooms, not to hold up the structure. Removing these barriers instantly makes your home feel twice as big. Plus, you’ll improve the flow between spaces, which is huge when you’re working with limited square footage.
The key is creating zones instead of rooms. Use furniture, rugs, or even different lighting to define spaces without physical barriers. I love how this approach makes everything feel connected while still maintaining distinct areas for different activities. It’s like having your cake and eating it too, but with walls instead of dessert.
3. Add a Kitchen Island with Hidden Storage
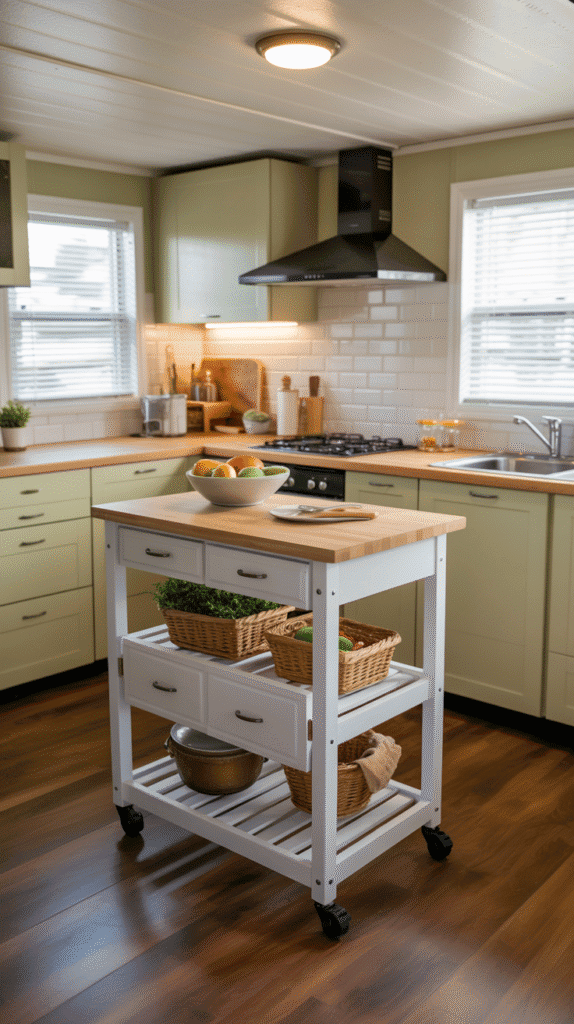
Kitchen islands aren’t just for those massive suburban homes, and anyone who tells you otherwise clearly hasn’t seen what a well-placed island can do for a singlewide kitchen. I’m talking about instant counter space, storage, and even a dining area all rolled into one genius piece of furniture.
Mobile kitchen islands are your secret weapon here. You get all the benefits of a permanent island with the flexibility to move things around when needed. I’ve seen people use rolling carts, converted dressers, or even custom-built units that slide perfectly into their space.
The real magic happens in the hidden storage compartments. Think pull-out drawers for pots and pans, wine racks, spice storage, or even a hidden trash bin. One of my favorite tricks is adding a butcher block top that doubles as extra prep space – suddenly you’ve got room to actually cook instead of playing kitchen Tetris every time you want to make dinner.
Here’s what to look for in a kitchen island:
- Wheels for easy mobility
- Multiple storage levels
- Electrical outlets for small appliances
- Towel bars or hooks on the sides
- Wine glass holders (because priorities)
4. Install Murphy Bed or Wall-Mounted Folding Furniture
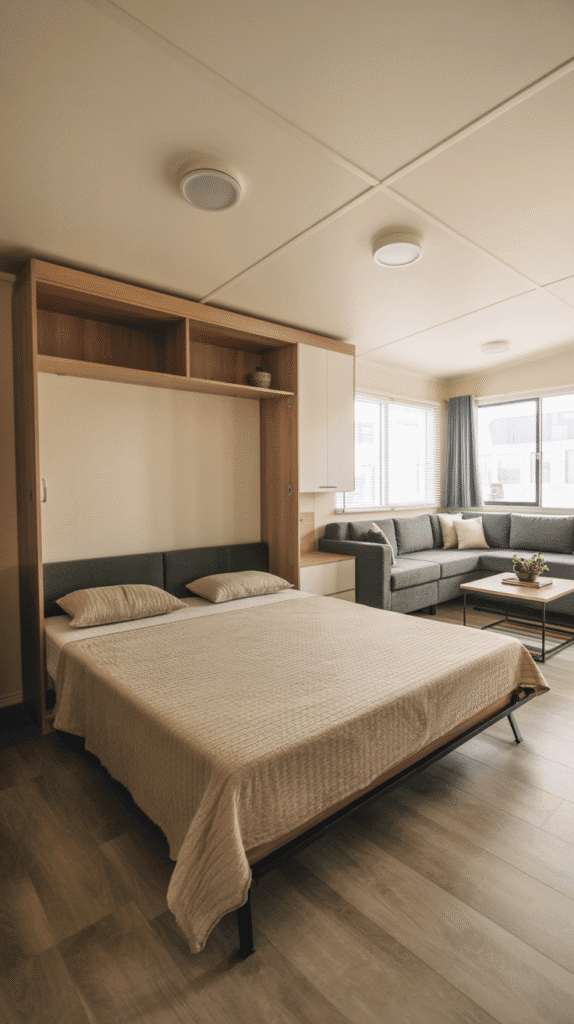
Murphy beds used to be this weird novelty thing, but let me tell you, modern wall beds are game-changers for singlewide living. I’m not talking about those clunky contraptions from old movies that tried to swallow people whole. Today’s versions are sleek, safe, and surprisingly affordable.
The beauty of a Murphy bed lies in its dual functionality. During the day, you’ve got a spacious living room or home office. At night, boom – instant bedroom. It’s like having a shape-shifting house, which honestly sounds way cooler than it probably is, but you get the idea.
Wall-mounted folding furniture goes beyond just beds, though. Fold-down desks, drop-leaf tables, and wall-mounted dining tables all serve the same purpose: maximizing your usable space when you need it, then disappearing when you don’t. I’ve seen people create entire home offices that fold flat against the wall when not in use.
The installation might seem intimidating, but most of these systems come with detailed instructions and mounting hardware. Just make sure you’re securing everything to wall studs – you don’t want your bed or desk taking an unexpected trip to the floor in the middle of the night.
5. Upgrade to Sliding Barn Doors Throughout the Home
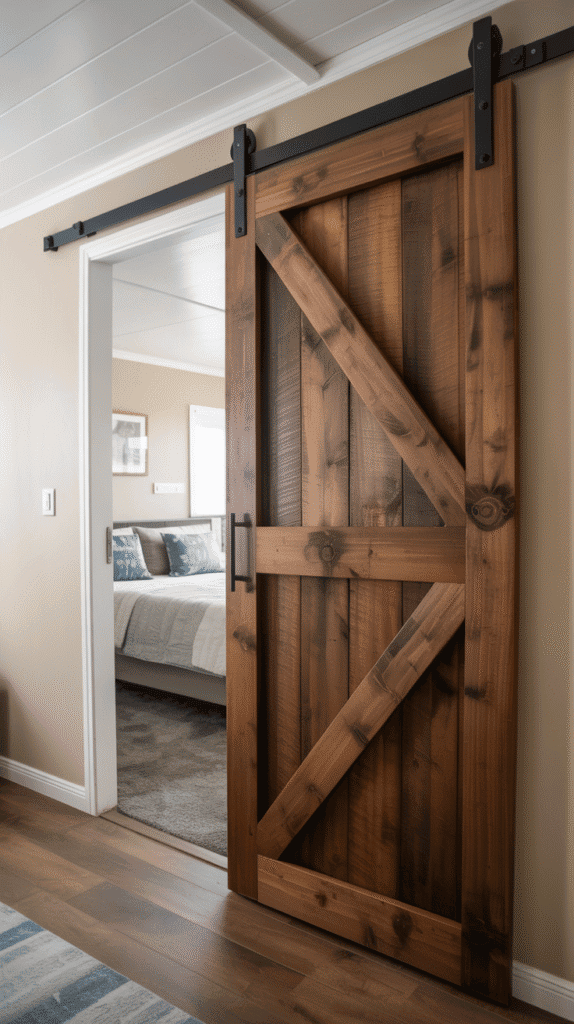
Traditional swing doors are space hogs, plain and simple. Every door that swings open is claiming valuable floor space that you could be using for something way more useful. Enter sliding barn doors – the stylish solution that saves space and adds serious character to your home.
I’ll be honest, when I first heard about barn doors in mobile homes, I thought it sounded a bit much. But after seeing them in action? Total convert. These doors slide along a track mounted to the wall or ceiling, which means zero floor space wasted on door swing radius.
The style factor is off the charts too. Whether you go rustic wood, sleek metal, or even frosted glass, sliding doors become a design feature instead of just a functional necessity. I’ve seen people use them for everything from bedroom doors to hiding laundry areas or pantries.
Installation is surprisingly straightforward:
- Mount the track securely to wall studs
- Hang the door using the provided hardware
- Add a floor guide to prevent swaying
- Adjust for smooth operation
Pro tip: Use sliding doors to create flexible spaces. Install them between your living room and bedroom to open up the space when entertaining, then close for privacy when needed.
6. Create Under-Stair Storage and Organization Systems
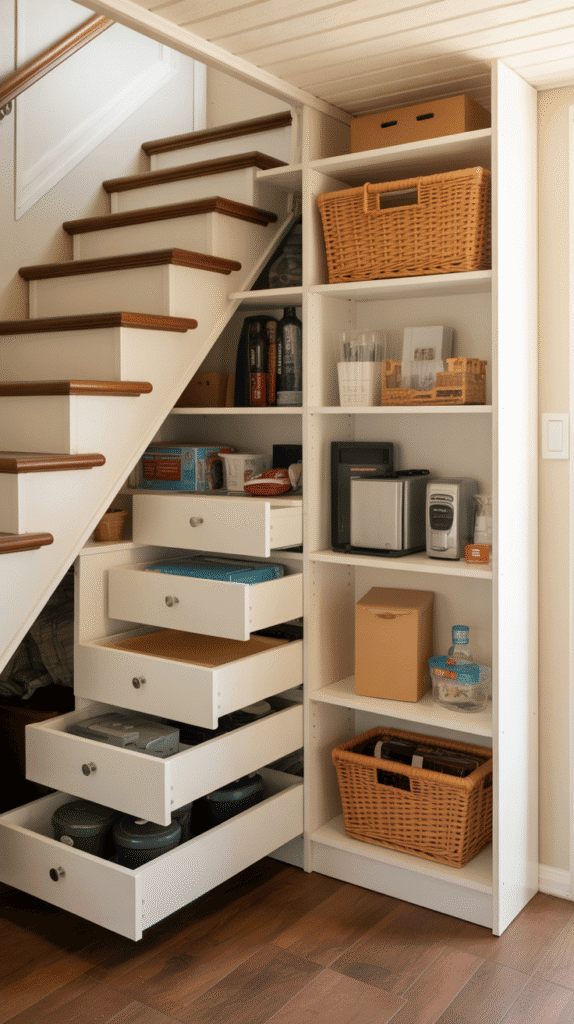
If your singlewide has stairs (and most do, even if it’s just a couple of steps), you’re probably wasting prime real estate under there. I see people use this space as a dumping ground for random junk, but with a little creativity, it becomes incredibly functional storage.
Under-stair storage is all about maximizing awkward spaces. The triangular area might seem challenging, but that’s exactly what makes it perfect for specific storage needs. I’ve converted under-stair areas into everything from mini pantries to cleaning supply closets to seasonal decoration storage.
The key is custom organization systems that work with the sloped ceiling. Pull-out drawers work great for the deeper areas, while the shorter spaces are perfect for shoes, cleaning supplies, or holiday decorations. You can even add built-in shelving that follows the stair line for a super clean look.
My favorite under-stair conversions include:
- Wine storage with custom racks
- Pet feeding stations with built-in bowls
- Mini mudrooms with coat hooks and shoe storage
- Home office nooks with floating desks
- Reading corners with built-in seating
The best part? This storage is completely hidden from your main living areas, so you can keep clutter out of sight while still having everything easily accessible.
7. Install Ceiling-Mounted Pot Racks and Hanging Storage
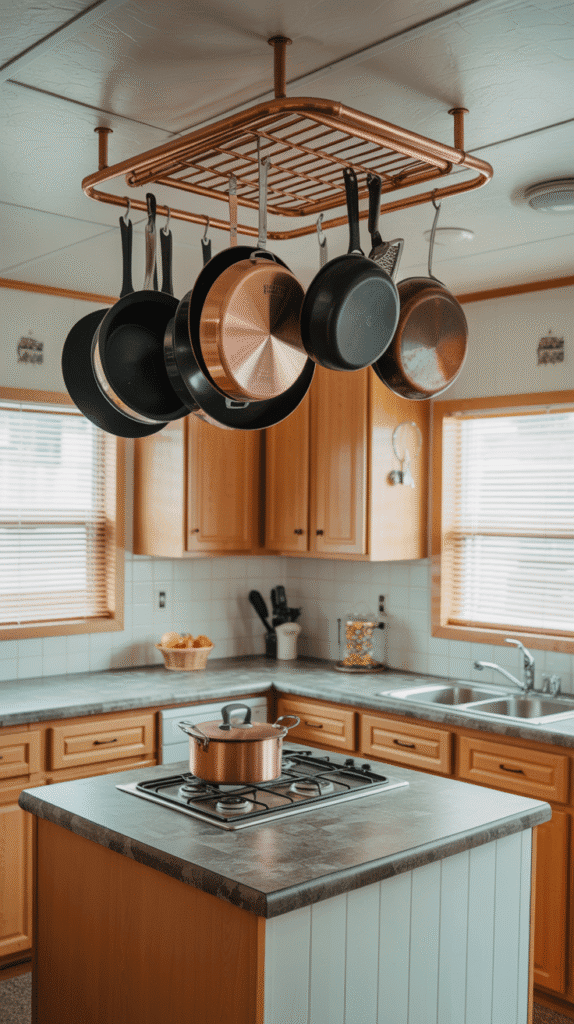
Look up. No, seriously, look at your ceiling right now. See all that unused space? Ceiling-mounted storage is like discovering a whole new room you never knew you had. This is especially clutch in kitchens and bathrooms where counter space is at a premium.
Pot racks aren’t just functional – they’re decorative. A well-organized collection of pots and pans hanging from the ceiling adds serious kitchen personality while freeing up cabinet space for other essentials. I love how this creates a professional chef vibe, even if your cooking skills are more “heat and eat” than “Iron Chef.”
The beauty of hanging storage systems extends way beyond cookware. Bathroom ceiling mounts work great for towels, plants, or even additional lighting. I’ve seen people hang everything from bike storage to craft supplies from their ceilings.
Installation tips for ceiling storage:
- Always mount to ceiling joists, not just drywall
- Use appropriate weight-rated hardware
- Consider the visual impact – keep it organized
- Leave enough clearance for tall people (learned this one the hard way)
Warning: Don’t go overboard with ceiling storage. The goal is functionality, not turning your home into an obstacle course. IMO, less is more when it comes to overhead storage.
8. Add Multi-level Shelving and Vertical Garden Walls
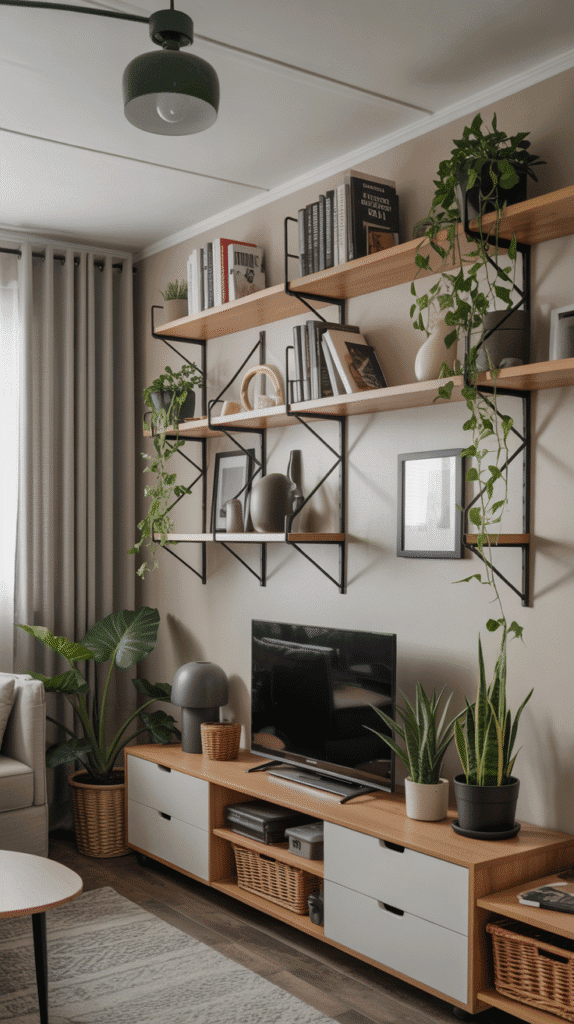
Vertical is your friend when floor space is limited. Multi-level shelving systems let you display books, plants, decorations, and storage containers without eating up precious square footage. Think of it as apartment-style storage that actually looks intentional and stylish.
Floating shelves create the illusion of more space while providing practical storage. I’m obsessed with how they make walls look less empty without the bulk of traditional bookcases. The key is varying the lengths and spacing to create visual interest instead of boring uniformity.
Living walls or vertical gardens take this concept to the next level. Even if you’re not exactly blessed with a green thumb, these systems make it easy to add life and color to your space. Herbs work great in kitchen vertical gardens – fresh basil and mint literally within arm’s reach? Yes, please.
Here’s what works best for vertical systems:
- Mix storage with decorative elements
- Use consistent color schemes to avoid chaos
- Incorporate lighting to highlight displays
- Choose plants that thrive in your lighting conditions
- Rotate seasonal displays to keep things fresh
The trick is balancing function with aesthetics. You want storage that works hard but doesn’t look like you’re living in a warehouse.
9. Build Window Seat Storage Benches
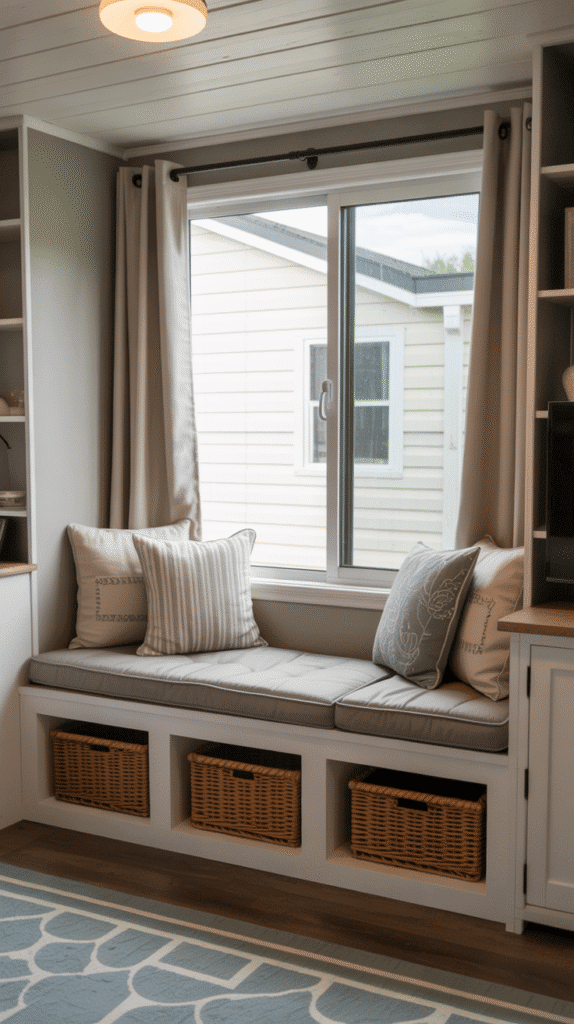
Window seats are pure genius for singlewide living. You’re taking an area that’s often underutilized and turning it into seating, storage, and a cozy focal point. Plus, who doesn’t love the idea of curling up by a window with a good book?
Built-in window seat storage serves triple duty: comfortable seating, hidden storage, and architectural interest. The storage compartment underneath is perfect for seasonal items, extra bedding, or anything else you need to keep but don’t use daily. I’ve seen people store everything from holiday decorations to craft supplies in these hidden compartments.
The construction is more straightforward than you might think. Basic framing, a hinged top, and some cushions are really all you need. The beauty lies in customizing the size and style to match your existing décor. You can go rustic with reclaimed wood, modern with clean lines, or traditional with decorative molding.
What makes window seats work:
- Proper measurements for comfortable seating height
- Sturdy hinges for the storage compartment
- Comfortable cushions (removable covers are clutch)
- Consider electrical outlets for reading lamps or device charging
- Add throw pillows for extra comfort and style
Pro tip: Position your window seat to take advantage of natural light for reading or relaxing. It becomes an instant favorite spot in your home.
10. Install Mirrored Accent Walls and Strategic Lighting
Mirrors are basically magic for small spaces. I’m not talking about those cheap, obvious mirror walls that scream “I’m trying to make my space look bigger.” Strategic mirror placement creates the illusion of space while adding light and visual interest to your home.
Mirrored accent walls work best when they reflect interesting views or architectural features. Placing a large mirror opposite a window doubles your natural light and makes the room feel twice as big. I’ve seen this trick transform dark, cramped spaces into bright, airy rooms that feel completely different.
Strategic lighting amplifies the mirror effect. LED strip lighting behind mirrors creates a soft glow that makes spaces feel larger and more luxurious. Under-cabinet lighting, table lamps, and floor lamps all contribute to creating layers of light that eliminate dark corners and dead spaces.
The key to successful mirror and lighting combinations:
- Mix different light sources for depth
- Use warm LED bulbs for cozy atmosphere
- Position mirrors to reflect light sources
- Avoid glare by angling mirrors properly
- Consider dimmer switches for mood lighting
Advanced tip: Mirrored backsplashes in kitchens reflect light while making the space feel more open. Just be prepared for a bit more cleaning – mirrors show everything, including those mysterious fingerprints that appear out of nowhere 🙂
Final Thoughts
There you have it – 10 genius upgrades that’ll transform your singlewide from cramped quarters into a space that actually works for your life. The best part? You don’t need to tackle all of these at once. Pick one or two that excite you most and start there.
My personal favorite is the combination of open floor plan with strategic storage. Remove a wall here, add some built-ins there, and suddenly you’re living in a completely different home. The transformation is honestly incredible when you see it happen.
Remember, small spaces have big potential – they just need the right approach. Every upgrade on this list maximizes both function and style because, let’s face it, life’s too short to live in a space that doesn’t make you happy.
So what’s your first move going to be? FYI, I’d love to hear how these upgrades work out for you. After all, the best home improvements are the ones that actually improve your daily life, not just look good on social media.
This post shows 10 Singlewide Mobile Home Ideas!